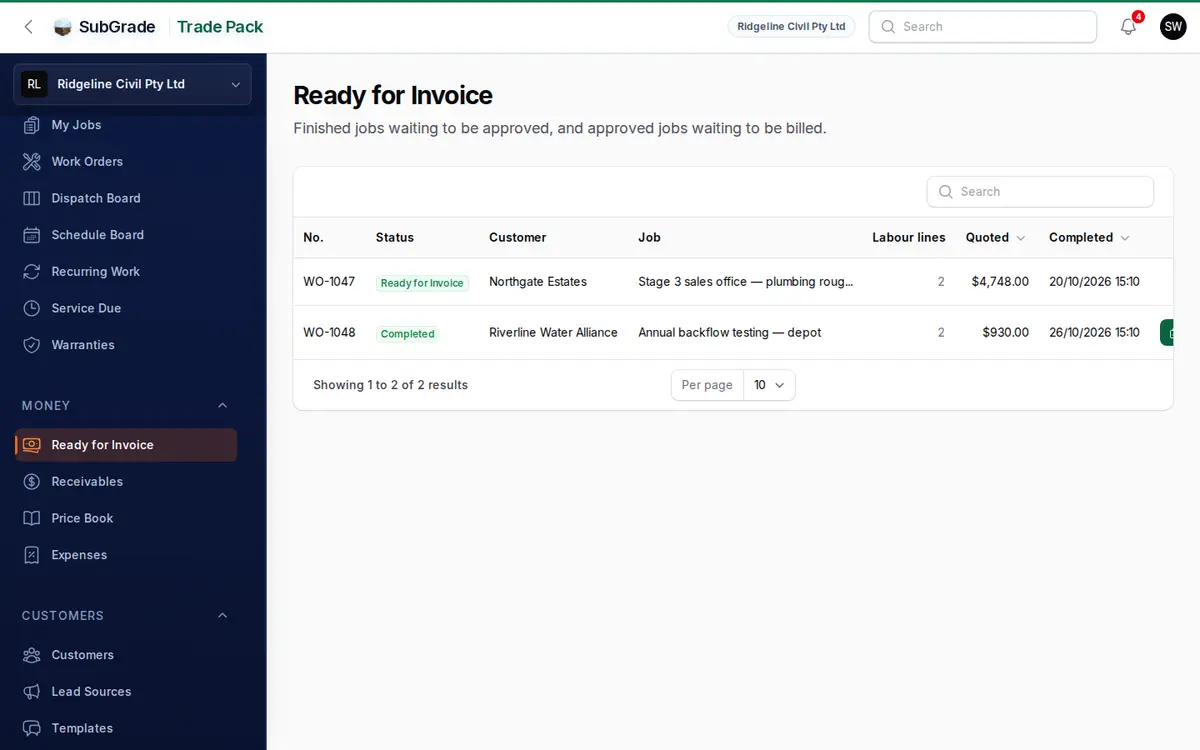
A worklist of finished jobs waiting on the office. It's the handoff between "the job's done" and "the customer's been billed".
How you bill depends on your workspace's Invoicing setting in Trade Pack Settings:
- Native (the default) — you raise and issue the invoice inside SubGrade.
- External — you invoice in your accounting tool and record the reference here.
Who can use it — Ready for Invoice is part of Trade Pack. You need the manage work order billing permission to open the page. See Roles & Permissions for how access is set.
Where to find it — Money → Ready for Invoice in the Trade Pack sidebar.
How to use it
The page lists jobs at Completed or Ready for Invoice, oldest finished first. Each row shows:
- No. — the job number. The search box finds jobs by this number.
- Status — Completed means waiting on approval. Ready for Invoice means approved and waiting to be billed.
- Customer and Job.
- Labour lines — how many time entries the job has. Zero is highlighted, because a job with no hours may have nothing to bill or may be missing them.
- Quoted — the quoted amount, which may not be the final invoice figure.
- Completed — when the job was finished.
Each row has:
- Approve — only on Completed jobs (see below).
- More — Review opens the job, Build billing lines builds invoice lines from approved work (native invoicing only), and Follow-up job creates a new draft job for remaining work, carrying the scope and address across.
Approving a job
Press Approve on a Completed job and confirm. In one step this:
- Approves its hours and parts.
- Sends the approved hours to that worker's timesheet, so they flow into the normal pay run. People costed under Cost of an hour in Trade Pack Settings are left out, because they're paid outside SubGrade.
- Moves the job to Ready for Invoice.
If a worker's timesheet for one of those days is already in a finalised pay run, you'll see Could not mark ready with the date, and the job doesn't move. Sort it out with whoever runs payroll, then try again.
You can also press Mark ready for invoice on the job itself, but that won't approve anything. It's refused while hours are unapproved, and it leaves draft parts as they are. Approve is usually simpler.
Native invoicing
- Open the job. Click More → Review. On a job at Ready for Invoice, the main button is Raise invoice, which takes you to the Billing tab.
- Get the lines right under Line items. How depends on how you priced the job:
- Itemised or fixed price — the quoted lines are already there. Check them.
- Hourly charge-out plus parts — press Build lines from actuals. This builds lines from approved hours and parts, and keeps lines you added by hand. The hourly rate comes from each entry's Billable rate on the job's Job tab, and a part's price from its Billable amount. Fill those in first, or the line comes through at $0.00.
- Lump sum with no lines — add at least one line. The Quoted amount alone doesn't become an invoice line.
- Create the draft. Press New invoice under Invoices. It copies the job's current lines and takes off any issued deposit invoices. Check it with PDF.
- Issue it. Press Issue and confirm. This allocates the invoice number, sets the due date from your payment terms, and locks the invoice.
Issuing a standard invoice moves the job to Invoiced. If the job was still at Completed, issuing also approves its hours and parts and passes through Ready for Invoice, so a job with an approval problem won't issue until that's fixed.
Once issued, Email sends the invoice to the customer. Customer invoice link in the job's Actions menu gives you a link where they can view it and your bank details. Your workspace's outstanding invoices are listed under Money → Receivables.
Good to know
- Check before you create the draft. A draft keeps the lines it was created with, and there's no button to edit or remove it. If the lines change, press New invoice again and issue the newer draft.
- Deposit invoices — Deposit invoice raises a draft for a percentage of the job's line items, so add the lines first. Issuing a deposit doesn't move the job. It's taken off the final invoice automatically. If you set a Default deposit, a customer accepting a quote online can raise and email a deposit by itself.
- Wait until the job is finished. A standard invoice issued before the job reaches Completed doesn't move the job, and the job won't move to Invoiced by itself later.
- Xero — if your workspace has Xero connected, Send to Xero appears on issued invoices. It's a button you press for each invoice. Without a connection you won't see it.
Voiding an invoice
An issued invoice can't be deleted, because it's a tax record. Press Void and give a reason. The invoice and its number are kept. If it was sent to Xero, void it there first.
If you void the only live standard invoice on an Invoiced job, the job returns to Ready for Invoice so you can bill it again. A Closed job stays Closed.
External invoicing
Use this if your invoices come from an accounting tool. SubGrade records the reference and doesn't create or sync the invoice.
- Raise the invoice in your accounting tool.
- Open the job and press Record invoice. It's the main button on both Completed and Ready for Invoice jobs.
- Enter the Invoice number / reference (required). Invoice link, Invoice amount and Invoice document are optional.
The job moves to Invoiced. From Completed, this also approves its hours and parts on the way through, so you don't need to press Approve first.
If the document arrives later, use Attach invoice in the Actions menu. Email invoice then sends the attached document to the customer. Attaching doesn't send anything by itself.
In external mode there's no Raise invoice button, no invoices list on the job, no Receivables page and no invoice reminders.
After invoicing
Use Record payment to record money received. It's the main button on an Invoiced job. In native mode the payment comes off the oldest unpaid invoice, and part payments are fine. This records a payment. SubGrade doesn't take card or online payments from customers.
When you're finished with the job, press Close in the Actions menu. Close needs "manage work orders". It doesn't check that the invoice has been paid, so check first. A Closed job can't be reopened.
Connected pages
- Work Orders — the full job record and status lifecycle.
- My Jobs — where technicians log the time and parts you approve here.
- Trade Pack Settings — invoicing mode, GST, numbering, payment terms and bank details.
- Billing — your workspace's own SubGrade subscription, not customer invoicing.
Tips & common mistakes
- Job missing from the list? Only Completed and Ready for Invoice jobs show here. In Progress, Invoiced and Closed jobs don't.
- No Approve button? It's only on Completed jobs. A job at Ready for Invoice is already approved.
- Can't approve? One of the worker's days may be in a finalised pay run. The message gives the date.
- Invoice comes out empty, or Issue is refused? The job has no line items. Add them or use Build lines from actuals, then press New invoice again.
- Labour line shows $0.00? The hours have no Billable rate. Add it on the job's Job tab and rebuild the lines.
- Build billing lines added nothing? It only uses approved work, so approve the job first.
- Looking for Record invoice? It only exists in external mode. In native mode, use Raise invoice.